CylindricalImageTexture applies the image to the object space using cylindrical coordinates. It maps one axis of the image to the axis of the cylinder, and the other axis of the image around the cylinder.
The command for a cylindrical image texture is as follows.
CylindricalImageTexture(int precedence, GenericPixmap * image_file,
  axis cyl_axis, double start_axis, double end_axis,
			  double theta, double span,
			  texture_tiling axis_tile, texture_tiling theta_tile,
			  axis image_main, texture_method apply_method,
			  int do_filter, int spec_0, int trans_0)
Parameters:
precedence:
All textures have a precedence. If an object has just one texture applied to it then just set this to zero. However if there are several textures, higher precedence textures are applied first. A negative precedence overrides all other textures.
image_file:
This must be a pgm, ppm or pbm file.
cyl_axis:
The axis that the cylinder is oriented about.
start_axis:
Position on the cylindrical axis to map the left edge of the image to if image_main = X or to map the top of the image to if image_main = Y.
end_axis:
Position on the cylindrical axis to map the right edge of the image to if image_main = X or to map the bottom edge of the image to if image_main = Y.
theta:
The angle around the cylinder to map an edge of the image to.
The left edge if image_main is Y or the top edge if image_main is X.
0 degrees on the Z axis is along the X axis increasing towards Y (anticlockwise about Z).
0 degrees on the Y axis is along the Z axis increasing towards X (anticlockwise about Y).
0 degrees on the X axis is along the Y axis increasing towards Z (anticlockwise about Y).
span:
Span defines the number of degrees around the cylinder that the image covers. One edge of the image is at theta and the other is at theta + span.
Tiling:
The tile options are SINGLE or TILED. axis_tile specifies whether or not to tile up the cylinder and theta_tile specifies whether or not to tile around the cylinder.
image_main:
This is the axis of the image that maps to the cylinder axis.
The other axis maps around the cylinder.
This should be X or Y.
apply_method:
The apply method options are TEXMETHOD_OPAQUE or TEXMETHOD_TRANSPARENT. A TEXMETHOD_OPAQUE image overrides the diffuse colour of the material and a transparent image alters the colour of the material by multiplying the diffuse colour of the image by the colour of the picture. See note at bottom of page for TEXMETHOD_TRANSPARENT_PINK.
do_filter:
This turns bilinear filtering on/off (TRUE is on; FALSE is off).
If bilinear filtering is off it will ray trace faster which is good for draft copies but the texture may appear pixelated in close up views.
spec_0:
When this is on it sets reflectivity of the object to zero where image is applied. This is useful if you have a reflective object with a non reflective image on it such as a paper label on a mirror surface.
trans_0:
If this is on it sets the transperancy of the object to zero where the image is applied. Example: A paper label on a glass surface.
Figure 13 show the image texture as it is applied to the two objects defined below.
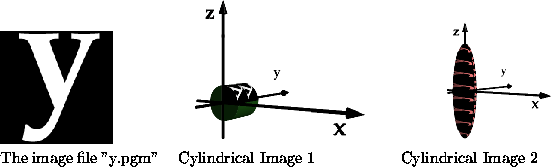
Figure 13: CylindricalImageTexture
  // Cylindrical Image 1
  the_object = bind(rotate(Z,Y,90,
               stretch(1.0,1.0,2,new_unitcyl())));
  the_object->material = new DSTmaterial(0.1, 0.3, 0.075,
                                         0.0, 0.0, 0.0,
                                         0.0, 0.0, 0.0,
                                         1.0, 1.0,1.0, 40.0, 1.0);
  the_object->texture =  new CylindricalImageTexture(0, "y.pgm",
                           Y, 0, +0.999, 0,  90, TILED, SINGLE,
                           Y, TEXMETHOD_OPAQUE, TRUE, FALSE, FALSE);
  LINK(the_scene, PLUS, bind(the_object));


  //Cylindrical Image 2
  object the_object2 = bind(stretch(1.0,1.0,4,new_sphere()));
  the_object2->material = ltred;
  the_object2->texture =  new CylindricalImageTexture(0, "y.pgm",
                            Z, 0, +0.999, 0,  180, TILED, TILED,
                            X, TEXMETHOD_TRANSPARENT, TRUE, FALSE, FALSE);
  LINK(the_scene, PLUS, bind(the_object2));
New texture options
Since version 1.1.1.0 a new option TEXMETHOD_TRANSPARENT_PINK has been added, which is the same as TEXMETHOD_OPAQUE execpt texture values of [255, 0, 255] (Magic Pink) become transparent.
Note: This only works for colour images.
Note: When drawing pink onto your image, be sure not to use an anti-aliased brush.
Note: If thin pink edges occur in your output, then turn off the bi-linear filtering.